Ceiling Fan Installation Wiring

By following my ceiling fan installation wiring diagrams, you should not have any troubles accomplishing the task yourself. Installing a ceiling fan is not as difficult as some may think.
Ceiling fans are very popular at our house. In fact, every bedroom has one. Although we have central air conditioning, the ceiling fan helps to circulate the cool air. It also lets my wife leave the air conditioner off longer to save on electricity as it cools the rooms off just by turning on the fan.
Just replacing ceiling fan with a new one? You need my step by step guide on how to install ceiling fan.
Ceiling Fan Installation Wiring Diagrams
Option #1:

In the first example, the power is coming into the fan and flows straight to a single pole switch. The ground wire will always be attached at every electrical box. The fan and light are controlled by one switch. Use the chain pulls for fan speed or to reverse direction.
Option #2:

This one is opposite to option 1... Power will start at switch and flow to fan. The ground wire will always be attached at every electrical box. The fan and light are controlled by one switch. Use the chain pulls for fan speed or to reverse direction.
Still looking for help? Do not see the exact diagram you need. Feel free to contact me with any wiring questions you might have.
Option #3:

This scenario and the next are probably the most common options for a ceiling fan installation wiring. This one has the power starting at the fan and flowing to a switch and a dimmer switch. The ground wire will always be attached at every electrical box. The fan will be controlled by the dimmer switch for variable speeds and the light controlled by a switch. You could easily substitute the switch for another dimmer for the light.
Option #4:

Similar to option #3 but with the power coming into the switch area and then flowing up to the fan. The ground wire will always be attached at every electrical box. The fan will be controlled by the dimmer switch for variable speeds and the light controlled by a switch.
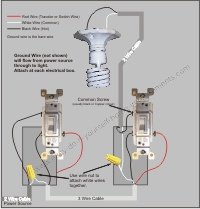
Option #5:

If your fan has a remote control option, this scenario will be the diagram you are looking for. This option has the power coming into the switch and flowing to the fan. The ground wire will always be attached at every electrical box. You fan speed, direction and light will be controlled by remote. Power to the fan will be controlled by the switch.
Hey, doing it yourself is great but if you are unsure of the advice given or the methods in which to job is done... don't do it. This site is merely a collection of how some people do home improvements. There is no way we can anticipate every situation and we do our best to inform of any risks for each job. Be sure to check local building codes for proper installation and permits.
If in doubt, hire it out.
Recent Articles
-
Wiring A 3 Way Switch?
Mar 09, 21 10:00 PM
 Need help wiring a 3 way switch? With easy to follow diagrams and instructions, you can have that convenience in no time.
 -
Wire a Switched Outlet
Mar 09, 21 09:56 PM
Want to turn a lamp on with a light switch? Sometimes it is handy to have an outlet controlled by a switch. Step by step instructions on how to wire a switched outlet -
Switched Outlet Wiring Diagram
Mar 09, 21 09:44 PM
 Looking to have an outlet be controlled by a switch? Follow my switched outlet wiring diagram to learn how.