How To Install Laminate Floors
Before you learn how to install laminate floors, you will have to choose which type of laminate floor you want to install.
Laminate flooring comes in a variety of sizes, thicknesses and price. I recommend the thicker the flooring, the better. This will help not only with the installation, but also the look and durability.
Laminate flooring started out as a less expensive way to get a "hardwood" look. Now laminate floor comes in many different looks... even the look of ceramic can be obtained using laminate flooring.
Once you determine the style of flooring you want, you will also need to get some underpadding. This also come in different thicknesses. Again, thicker is better.
Why would you need underpad for a faux wood floor you ask? The underpadding helps deaden noise from walking on it and it makes the floor "softer" and since laminte floors are floating floors (nothing except gravity holding them down) it allows for easy expansion.
Oh, one more thing, if you are wondering how to install laminate floors over concrete (perhaps in your basement), get the under padding with the built in vapor barrier. This will keep the moisture away from your flooring.
Step 1 of how to install laminate floors
Let's gather some tools first.
 Rubber mallet
Tape Measure
Chop saw or hand saw
Pull bar made for installing laminate floors
Packing tape or the red "tuck" tape
Tapping block
Pry bar
Hammer
Door jamb saw
spacers or small pieces of wood
Chaulk line
Step 2 - Ripping out existing carpet
Ok, now we can start learning how to install laminate floors! The great part in how to install laminate floors is that you can install this type of flooring virtually anywhere!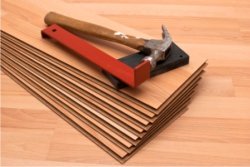 You can install laminate flooring over most existing flooring except carpeting. Linoleum, ceramic tile and concrete are not a problem.
If you are wanting to install in a room that has carpeting, you are going to have to rip that flooring out before you start.
Don't forget to remove all the spike strips around the outside of the room and ensure that there are no staples or nails sticking up in the room.
Removing carpet is sweaty and dusty work. It is amazing how much dust and dirt gets trapped in our carpets. Installing Laminate flooring is a great way to reduce dust and pet dander for you that have allergies.
You will also need to remove your baseboard and doors. If you have really nice trim, you can try to save it by using a small pry bar and gently remove the baseboard. If you are going to replace it, just rip it out. Not only is this faster, it kind of feels good too.
Some people don't want the extra cost of removing their baseboards. This is OK, but you will still need to put quarter round around the room to hide the gap left from installing the laminate floor.
Step 3 - Laying the underpad
Now that your room is empty, lets start to install the laminate flooring. First lay out the underpadding. Tape the seams so the underpad is one piece.
Measure your room, You should always start along the longest wall. If your room is almost square, install the laminate floor parallel to the main natural light source (if possible). The light from the window will not show the seams in the flooring as much if installed this way.
Put your spacers against the wall. A gap of approximately 1/4" will be adequate for the expansion of your floor from the changes in humidity.
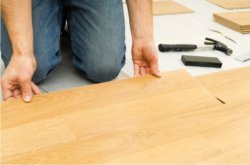
Step 4 - Installing the laminate
Lay the flooring along the wall, clicking it together as you go. When you get to the end, measure from the wall to the last piece of flooring, minus 1/4" and cut.
The last piece in a row needs to be installed using a "pull-bar". Put the piece of laminate flooring in as close as possible by hand, then place the pull-bar between the wall and the floor and tap it tight.

You can use the remaining piece of laminate flooring to start the next row, as long as it is longer than 8". There are a couple of ways on how to install laminate floors. One way is to click the long side of the plank in first by holding the piece at approximately 45 degrees and pushing down.
Once this is clicked in, you can use a tapping block to close the gap along the short side of the plank. The other way is to click the short side first and tap the long side in to attah the flooring together.
Carry on clicking and cutting until you find yourself in a jamb.
Ok, that was a bad joke.
Step 5 - Cutting around the door jam
When you want to have a professional finish around a door jamb, you will need to cut the bottom of the jamb off at the perfect height for your flooring to slide underneath.
Do this by placing a scrap piece of flooring upside-down on a piece of under padding and cut the door jamb with a door jamb saw.

These saws are not overly expensive and will make you floor look amazing. I never recommend trying to cut your laminate floor around a door jamb. It never really works out and looks, in my opinion, really bad. Also, it will make cleaning the floor a lot easier.
Once you get to your last row, chances are you will have to cut these pieces lengthwise as well. To do this, set the board upside down and trace the contour.
Cut along the line either with a table saw or a Skil Saw and install the flooring in the same manor as an end piece. You will have to use the Pull Bar.
Now that you know how to install laminate floors, you can change the floor easily in any room in your house.
Hey, doing it yourself is great but if you are unsure of the advice given or the methods in which to job is done... don't do it. This site is merely a collection of how some people do home improvements. There is no way we can anticipate every situation and we do our best to inform of any risks for each job. Be sure to check local building codes for proper installation and permits.
If in doubt, hire it out.
Recent Articles
-
Wiring A 3 Way Switch?
Mar 09, 21 10:00 PM
 Need help wiring a 3 way switch? With easy to follow diagrams and instructions, you can have that convenience in no time.
 -
Wire a Switched Outlet
Mar 09, 21 09:56 PM
Want to turn a lamp on with a light switch? Sometimes it is handy to have an outlet controlled by a switch. Step by step instructions on how to wire a switched outlet -
Switched Outlet Wiring Diagram
Mar 09, 21 09:44 PM
 Looking to have an outlet be controlled by a switch? Follow my switched outlet wiring diagram to learn how.

